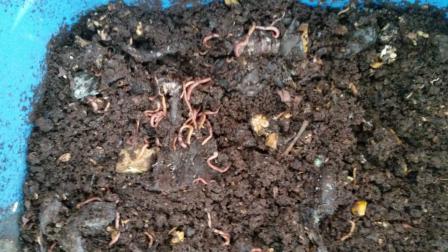
Keeping worms indoors to compost kitchen garbage is often referred to by several names: vermiculture, worm farming, worm bin, and worm composting are among the more popular references. For our purposes, any of the above references would be sufficient. To add a little clarity, some definitions of worm related vocabulary might be useful. Vermicompost is a more general term than worm castings, or vermicast. A vermicast is a manure, the material deposited from the worm, after it has moved through the digestive tract. Vermicompost contains lots of worm castings, but also consists of partially decomposed bedding and organic bits with recognizable fragments of plants, food, and bedding. Worms of all ages can be found in vermicompost. If the worm bin is left unattended for around six months, the worms will eat all of the bedding and organic material, and the entire contents will be converted to vermicast or just castings. And lastly, vermiculture is the culturing of earthworms. Culture, in this sense, refers to when small organisms are raised in a controlled environment.
Worm composting is an incredibly efficient way to convert your kitchen waste, cardboard, newspaper, junk mail, and other organic matter into nutrient-rich compost for your garden plants and flower beds as well as house plants. Worms can’t eat this garbage directly; it must be broken down so that they can digest it. Worms rely on bacteria and other microorganisms to break the food down into small particles that the worm can fit inside its mouth. Once the worm eats the food, sand particles and muscles work together to grind up and further breakdown the food particles before it is actually digested. The worm’s gut is full of tiny microbes that do the majority of the digestion.
Types of Worms
Not all worms are created equal. It is essential to choose the right type of worms for your home composting system. You want worms that can process a large amount of organic material and would probably prefer a variety that will not readily escape the container or bin. They should reproduce quickly in confinement, and be tolerant of the disturbance caused by lifting the lid, and burying trash regularly. The earth-working variety of worms such as the night-crawler require large amounts of soil and like to dig deep burrows. They don’t want their boroughs to be disturbed, and will quickly move around to escape your digging when you are burying their food. Night-crawlers do play an essential role in your soil outside. They surface at night, forage for food and draw organic matter deep into their borough where they feed on it. They are mixing the organic material at the surface into deeper layers of the soil where it can be more readily consumed by plants. They also bring minerals from the subsoil to the surface in their castings. They are useful to see in your garden, but not the best choice for the worm bin.
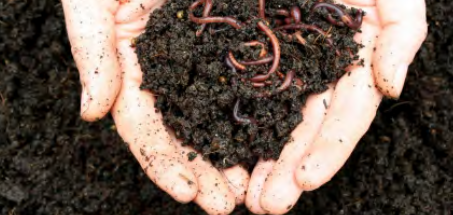
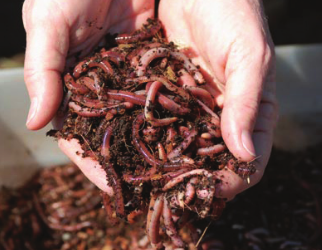
Red worms are the best choice for a home composting worm bin for the following reasons; they are litter dwellers and because they tolerate disturbances well and do not have a predisposition to escape. They are naturally found among masses of decaying vegetables such as fallen leaves and manure piles, or under rotten logs. Red worms are found in mineral soils only when large amounts of organic matter are present. Red worms have many different common names, some of them include red wriggler, manure worm, or red hybrid. To purchase worms, we recommend you contact a local worm farm, or order online if there are none in your area. Check findworms.com to find the worm farm closest to you.
Placement of Worm Bin
Placement of your worm bin should have several considerations, both of your needs and for the needs of your worms. In order for the worms to be happy, you’ll need to consider temperature, moisture, acidity, and ventilation. Equally important are your considerations, which will include convenience and aesthetic preferences.
- Temperature – Red worms feed most rapidly at temperatures between 59-77F o(15-25Co). They can tolerate temperatures as low as 50F o (10Co), but will die if the temperature goes below freezing. In cold northern winters, they are known to dig into ground that is covered with straw, leaves, and manure, which provides them heat, food, and insulation for winter survival. Bedding temperatures above 86oF (30oC) could also be harmful to your worms. Locations that get too hot might include a poorly ventilated attic, outside in direct sunlight (especially with a black/dark colored bin) and the upper elevations of a greenhouse.
- Moisture – Worms breathe through their skin, which must be moist for them to exchange air and waste products to/from their environment. Too much moisture, present as standing water in the bin can reduce available oxygen and cause the worms to drown. Be sure to place your bin where there is no danger of natural flooding, which could also drown worms. To gauge moisture look at the materials. You should never see dry scraps, especially paper, in a working tray. If the bin is running dry, add water directly, or soak paper in the water before adding it. Also, a majority of common worm foods are high in moisture. Just be sure to not add too much moisture at the same time. If you suspect it is too moist, do a squeeze test. Hold a small amount of bedding between your fingers and squeeze. You want to see a drop or two of water. The bedding should be as moist as a wrung-out sponge. Very wet bedding will tend to smell bad, so add some more dry bedding material to compensate.
- Acidity – Red worms can tolerate a relatively wide range of acidity in their environment, but slightly acidic conditions are best. A pH between 5-9 is suitable for red worms. The worms may try to escape from a bin with a low (acidic) pH below 4.0 and should be avoided.
- Ventilation – Worms need to consume oxygen in their bodily processes and will produce carbon dioxide, just like we do. Wrapping your worm bin in plastic will eventually smother your worms, they need to breathe.
Your needs and expectations
The convenience of your worm bin relates directly to the placement of your worm bin. Since food preparation is done in the kitchen, the most convenient place might be in the kitchen. An insulated garage might also be a good choice if the temperature range was acceptable. The basement is another ideal location because it is out of the way, and typically an acceptable temperature range.
It is important to understand what expectations are realistic when starting a worm bin. For example, you can reasonably expect to bury a large portion of your biodegradable kitchen garbage in a properly prepared worm bin, check it occasionally, make judgments about what adjustments need to be made, then harvest the worms and vermicompost or vermicast after several months. However, it would be unrealistic to expect to be able to dump all your kitchen trash into a bin, and 2 weeks later to collect quantities of fine, dark worm castings to sprinkle on your house plants. Keeping a worm bin over the winter will minimize the number of trips to the compost pile throughout winter, but there will be times when this is necessary. Most people will do best maintaining two different containers, one to collect food for the worms, and one to empty on the compost pile. Separating them will also allow you to keep the seeds in the compost pile, where there is some chance they would be killed by the heat of the compost. Earthworms seldom kill tomato or weed seeds.
If you expect to grow extra worms for fishing, you should understand this comes with a relatively high level of maintenance. If this is your goal, you should expect to harvest worms every 2-3 months, transfer worms to fresh bedding, and accept vermicompost that is less finished. Try this recipe as the ideal worm fattening food: 5 parts chicken layer mash, two parts wheat or rice bran, 1 part agricultural lime, 1 part wheat flour, 1 part powdered milk. Your local feed store should have chicken mash, or you can substitute cornmeal. It will take several days to fatten up your worms. Worms that typically eat compost materials are probably smaller than most people would prefer for fishing. If, however, your goal is finished worm castings for plants, the maintenance level is relatively low. You will need to bury biodegradable kitchen waste, then leave it alone. The worms will eat the food and deposit the castings at their own pace, and will eventually leave you with a bin full of vermicompost.
Worm Containers
You can make worm containers from just about anything. Plastic bins can be good choices, or you can also make a simple box from wooden boards or plywood. Wooden boxes will breathe better than plastic ones, but plastic will last much longer. If using wood, make several, and rotate them in and out of use. Letting boxes completely dry out between use will extend their life a great deal. We don’t recommend using pressure treated wood if building your own, the chemicals used to treat the wood may leach into your vermicompost. The box can be made in any size, but a typical starting point for a box would be about 2 feet square, and 1 foot high, and can be open on the top. Both plastic and wood boxes should have adequate ventilation. Several holes should be drilled below the soil line to increase the contact area of the air and soil. Large diameter holes can be drilled in wood boxes and covered with screen to keep the soil in. Stackable boxes help to contain any dripping, and those with an open bottom allow the worms to migrate from bin to bin to allow them to find a comfortable environment.
How many worms?
Worms are typically sold in terms of weight. Worms can consume their weight of organic matter in a day, regardless of their size. Many small worms can be just as effective as a smaller population of larger ones; it is the overall biomass of the worms that matters. Ideally you would have enough worms to eat the average daily waste you plan on burying. A good baseline would be planning for the worms to eat about ½ their weight in kitchen waste. If you average 1 pound of kitchen waste per day, you would need 2 pounds of worms to keep up with you.
Your worm population will adjust to their environment. The worm population will always seek an equilibrium that balances the available resources with the population of worms. Given good conditions, the worms will multiply and increase numbers. With poor conditions, they will automatically reduce to a sustainable level. You don’t need to purchase the entire amount of worms you need to get started; it is likely a couple dozen would suffice if you are very patient. You will need to understand that in the beginning, your worm bin may not be able to keep up with your overall kitchen waste output until they have had a chance to build their population. It is recommended that you start with at least 1 pound of red worms, which should get you something like 1,000-2,000 worms, depending on their size.
Worm Bedding:
Worm bedding holds moisture and provides a medium in which the worms can work, as well as something to bury the garbage in. Worm bedding is usually some form of cellulose, and a good carbon source. The bedding will be eaten by the worms, and needs to be non toxic to them. The most desirable bedding is also light and fluffy, two conditions necessary for air exchange throughout the depth of the container. This exchange helps to control offensive odors by reducing the chances that anaerobic conditions will develop.
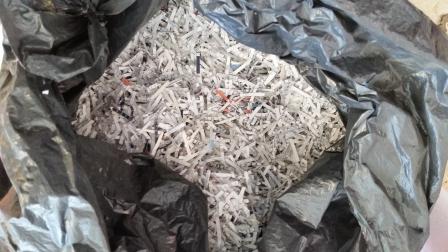
Suitable bedding materials: Hand shredded newspaper is readily available and probably the least expensive option. Fully open a section of the newspaper, and tear it lengthwise down the centerfold in strips 1-3 inches wide. This can be used directly as bedding, or you can rip the pieces smaller if you prefer. A shredder machine can supply high volumes of excellent bedding material. We tend to limit the amount of waxy, colorful advertisements for fear of the chemicals used in ink. Black ink is mostly soy-based these days because it is cheaper to produce, so it should not be introducing harmful chemicals. Leaf mold can also be used, but may introduce unwanted organisms to your worm bin. Composted animal manure from horse, rabbit, or cow can also be good worm bedding material. Manure is a natural habitat for worms, but tends to be difficult to obtain. If you do find some, make sure the animals were not recently de-wormed, because those same chemicals that kill the parasitic worms will kill your red worms as well. The initial odor from the compost will disappear within a few days after the red worms are added. Manure is likely to contain other organisms such as mites, sowbugs, centipedes, or grubs, which some people would prefer not to have in their worm bin. If you decide to use manure, add some water and wait a day or two to monitor the temperature, and make sure it stays below 86oF. Manure can put off a fair amount of heat while it is decomposing and can kill your worms in the process. Worms can be added directly once there is no danger of overheating. Coconut fiber, known as coir is a clean, easy to prepare worm bedding. It comes as a block of compressed fiber, which expands rapidly when placed in the appropriate volume of water. Wood chips can also be used as a worm bedding. They can be screened out from the finished vermicompost and reused, and do a good job when mixed with other bedding materials or leaves.
Additions to bedding
- Soil – Adding a handful of soil will provide some grit to aid in breaking down food particles within the worm’s gizzard. It also introduces an inoculate source of a variety of soil bacteria, protoza and fungi which will aid in the decomposition process. It is these microorganisms that do most of the work, the worms eat those portions the microorganisms are digesting. Worms do not have teeth, or a complicated stomach, so they rely on other organisms to get the process started for them.
- Calcium Carbonate (powdered limestone) – can also be used to provide grit. It has the further advantage of keeping the bin from becoming too acidic, and providing calcium, which is necessary for worm reproduction and survival. Pulverized egg shells can also serve the same purpose.
- Rockdust is another good source of grit. It is produced in gravel crushing operations and glacier movements, and contains many trace minerals that support plant growth.
Worm Food
| Good Food for Worms | ||
|---|---|---|
| Apples and peels | Cucumber | Pancakes |
| Baked Beans | Egg Shells | Pears |
| Banana and peels | Grapefruit rind | Pineapple rind |
| Biscuits | Gravy | Pizza crust |
| Cabbage | Grits | Potato salad |
| Cake | Lemons | Potatoes and peels |
| Celery | Lettuce | Spaghetti |
| Cereal | Macaroni | Spoiled foods from refrigerator |
| Coffee grinds w/filter | Oatmeal | Tea Leaves |
| Corn Bread | Onion Peels | Tomatoes |
| Cream of wheat | Orange Rinds | |
Any vegetable waste generated during food preparation can be fed to worms. Some things to avoid/limit: Excess quantities of citrus fruit can kill worms. A dozen oranges in a small worm bin would not be a good idea, for example. Meat and dairy items should probably be avoided, mostly because of the foul odors they produce while decomposing. Many nuisance organisms are also attracted to decomposing meat, such as flies, mice, ants, and rats. Your worms can compost meat just fine; you just might prefer that they didn’t do so in your kitchen. These wastes are probably better off buried deep in your garden if you want your garden to benefit from them. If you are willing to experiment, we do encourage that, but most people will prefer not to compost meat and dairy products in their worm bin. Pet feces are also not acceptable because they can transmit diseases. Cat urine smells very bad, and the ammonia present could eventually kill your worms. Depending on your setup, cats might find a worm bin an attractive litter box, so make sure to at least cover the top to discourage this behavior. Human waste is probably not the best ingredient either because it too can transmit disease. We like to avoid feeding seeds to worms; they seldom process them enough to make them sterile. Crumbled moldy bread, leftover pasta, and used coffee grinds are some favorite worm foods.
Maintenance
Your worm bin can be relatively maintenance-free. You should plan on adding your kitchen waste regularly. It doesn’t need to be daily, or on any particular frequency other then when you are ready, or your small kitchen bucket or container is full. Since worms don’t have teeth, they will be able to begin eating food that is chopped up very small to increase the surface area for bacteria and microorganisms to work on. It is not necessary to chop worm food up very fine; it will just speed up the rate at which the worms are able to consume it. If you don’t mind a few corn cobs in your finished vermicompost, chopping everything to tiny pieces may not seem like an efficient use of your time. While burying the waste, you should take notice of how the bedding and worms look. They should be moist, but not too wet. Standing water in the bottom of the container is not desirable. To correct for too much moisture, just add bedding materials. You can also add bedding materials as you go; they will help to cover up the food to minimize fruit flies and control odors. An ideal ratio is about 1 part bedding to 1 part food items. Your worms could probably handle a month or two without any care if they had to, so no need to worry if you want to take a vacation.
If the worm bin is left unattended for around six months, the worms will eat all of the bedding and organic material, and the entire contents will be converted to vermicast. Vermicast is considered overworked, and has probably lost some of its nutritional value compared to vermicompost. Since no food remains for the worms, most of the worms will die and decompose. The few worms that remain will be small, inactive, and undernourished.
Leachate
During the composting process, gravity pulls moisture towards the bottom of the tray, dragging nutrient-rich particles with it. This nutrient-rich liquid is called leachate. Some systems will incorporate a drain at the lower level to drain off this excess liquid. It should take some time before your system is producing any leachate. You can use this full-strength leachate on your outdoor plants, but it is best to mix it with equal parts water for use on potted plants. Compost tea is similar to leachate, with the exception that it is not a naturally occurring process. To make compost tea, mix 1 cup well-processed castings in 1 gallon of water and steep overnight at room temperature. Shake, mix, or aerate with an aquarium pump if desired, then use the solution within 12 hours to water or spray plants.
Harvest
There are several methods to harvesting vermicompost, depending on your preferences. The ideal end product consists of a large amount of worm castings and should look and smell much like earth. To harvest vermicompost the three basic methods are dump and hand sort, worm sorting, and divide and dump. Of the three methods divide and dump is probably the easiest. If you want worm free vermicompost, you could try to find a colander with large holes to separate worms from the vermicompost. You can simply return the larger pieces of organic matter back into the bin.
Dump and hand sort
This method requires a large sheet of plastic and a good light source (either the sun or a 100W light bulb would be sufficient). The idea is to dump the contents of the box onto the large plastic sheet laid out on the floor. Shape the worms/compost into many cone-shaped piles. If adequately lighted, the worms will migrate to the bottom of the piles, which allows you to skim some vermicompost from the top of each pile. Keep harvesting a small amount of vermicompost from each pile, rotating through all the piles, and eventually, you will be left with piles that are highly concentrated with worms. This method requires the most work, but will save the most worms to put back into use for your next bin, and will allow you to continue composting at a high rate because of the large worm population to start your next container.
Worm sorting
This method is utilized with commercially available stacking units, but can also be replicated in a homemade single bin system. The idea is to offer the worms a new place with bedding and fresh food to migrate to once their food is mostly eaten, and you are ready to harvest the vermicompost. This can be accomplished inside the same bin; also, just push all of the vermicompost to one side, then add more bedding material to the other half, and start burying your food in the new half. You may find this method more successful when the food side is covered with plastic to maintain higher moisture levels. With the commercial units, when the worms are done feeding on the bottom trays, they migrate to the top where the food is placed continuously. When ready, the bottom trays are harvested as vermicompost.
Divide and dump
This method is probably the easiest method, but you will lose a large amount of worms. Using this method you take out 2/3 of your vermicompost/worms and use them as desired in your garden, worms and all. Leaving 1/3 of the vermicompost/worms will be sufficient to keep the system going, and you can add new bedding material and continue to bury food as usual. Remember that there are about 1/3 the worms, so they will need less food until their population is built back up.
1 comment
Thank you for this article on worms. This has been the most helpful information for me and I have great book and have watched many videos. Great job!